If you are doing development work with SItecore 7.5+ and beyond, you may want to set up MongoDB to connect to Sitecore locally or on your DEV, QA, STAGING servers. This is just a brief tutorial on the steps needed to set up MongoDB on your as a service, and then validate that it is connected to your local SItecore instance via RoboMongo. This post relates to Sitecore versions 7.5 and up.
- Download the MongoDB installer here: MongoDB
- Install using the Custom installation so you can change the default location. Typically, I put all my projects and websites on a separate non-operating system drive such as a D: drive. I installed to D:/MongoDB/.
- In the folder “MongoDB” create a folder called “data” and inside that folder, create a folder called “db”. These will not be created for you during install so you will need to create them.
- Create a new .config file in the “MongoDB” folder and name it “mongo.config”. This is where we will store the configurations for MongoDB.
- Copy/paste the configuration into the new “mongo.config” file and modify to your specific workstation:
dbpath=D:\MongoDB\data\db
logpath=D:\MongoDB\log\mongo.log
smallfiles=true
- Next, look in the “MongoDB” folder. You may need to create the “log” folder and put a “mongo.log” file in the that folder for the next line to succeed if it was not created during the installation of MongoDB.Now, install MongoDB as a Windows Service, so it will start every time you start-up Windows and stay running. Open up a Command Prompt (Run As Administrator) and type in the following (modify if needed for your filepaths):
D:\MongoDB\bin\Mongod.exe --config D:\MongoDB\mongo.config --install
- This will create a new windows service called MongoDB. Now, to start the service simply type in the following:
net start MongoDB
- You can use GUI tools like RoboMongo to work with Mongo data. Typically, Sitecore connections strings are already setup OOTB so you really just need to set up MongoDB. If you want to verify that your data is being stored then simply download RoboMongo. The example below is using MongoVUE, but I don’t recommend as it has been problematic in the past to download from their website. However, the process is basically the same for RoboMongo.
- Once installed you simply click the green plus icon to add a connection, then type in the name of the connection, and the server. Since, you this is on your local workstation you will use localhost OR 127.0.0.1 then save.
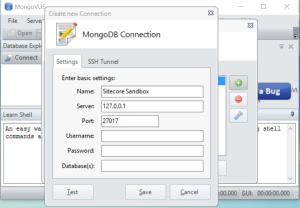
Add Connection In MongoVUE
- Now you should be able to see your connection listed in MongoVUE, and if you expand the connection you will see your tables and data being captured from Sitecore.

Sitecore Experience Data Is Connected
During the making of this blog post, I referred to these blog posts below, which helped me to achieve setting up my local developer workstation to run MongoDB as a Windows Service and connect it to a Sitecore 7.5+ instance. One last thing, if you are using SIM (Sitecore Instance Manager), you can also perform all the above in one click. Happy coding!
Setting up MongoDB on Developer Machine:
https://briancaos.wordpress.com/2014/10/01/sitecore-and-xdb-setting-up-mongodb-on-your-developer-machine/
Install MongoDB on Windows:
http://www.mkyong.com/mongodb/how-to-install-mongodb-on-windows/
